SELinux Administration
- Controlling the activation mode, checking operational status, setting security contexts on subjects and objects, and switching Boolean values.
Utilities and the commands they provide
libselinux-utilsgetenforcegetsebool
policycoreutilssestatussetseboolrestorecon
policycoreutils-python-utilssemanage
setools-consoleseinfosesearch
SELinux Alert Browser
-
Graphical tool for viewing alerts and debugging SELinux issues.
-
Part of the
setroubleshoot-serverpackage. -
In order to fully manage SELinux, you need to ensure that all these packages are installed on the system.
Management Commands
SELinux delivers a variety of commands for effective administration. Table 20-1 lists and describes the commands mentioned above plus a few more under various management categories.
Mode Management
getenforce
- Displays the current mode of operation
grubby
- Updates and displays information about the configuration files for the grub2 boot loader
sestatus
- Shows SELinux runtime status and Boolean values
setenforce
- Switches the operating mode between enforcing and permissive temporarily
Context Management
chcon
- Changes context on files (changes do not survive file system relabeling)
restorecon
- Restores default contexts on files by referencing the files in /etc/selinux/targeted/contexts/files/
semanage
- Changes context on files with the
fcontextsubcommand (changes survive file system relabeling)
Policy Management
seinfo
- Provides information on policy components
semanage
- Manages policy database
sesearch
- Searches rules in the policy database
Boolean Management
getsebool
- Displays Booleans and their current settings.
setsebool
- Modifies Boolean values temporarily, or in the policy database.
semanage
- Modifies Boolean values in the policy database with the
booleansubcommand.
Troubleshooting
sealert
- The graphical troubleshooting tool
Viewing and Controlling SELinux Operational State
/etc/selinux/config
- One of the key configuration files that controls the SELinux operational state, and sets its default type
The default content of the file is displayed below:
[root@server30 ~]# cat /etc/selinux/config

# This file controls the state of SELinux on the system.
# SELINUX= can take one of these three values:
#     enforcing - SELinux security policy is enforced.
#     permissive - SELinux prints warnings instead of enforcing.
#     disabled - No SELinux policy is loaded.
# See also:
# https://access.redhat.com/documentation/en-us/red_hat_enterprise_linux/9/html/using_selinux/changing-selinux-states-and-modes_using-selinux#changing-selinux-modes-at-boot-time_changing-selinux-states-and-modes
#
# NOTE: Up to RHEL 8 release included, SELINUX=disabled would also
# fully disable SELinux during boot. If you need a system with SELinux
# fully disabled instead of SELinux running with no policy loaded, you
# need to pass selinux=0 to the kernel command line. You can use grubby
# to persistently set the bootloader to boot with selinux=0:
#
#    grubby --update-kernel ALL --args selinux=0
#
# To revert back to SELinux enabled:
#
#    grubby --update-kernel ALL --remove-args selinux
#
SELINUX=enforcing
# SELINUXTYPE= can take one of these three values:
#     targeted - Targeted processes are protected,
#     minimum - Modification of targeted policy. Only selected processes are protected.
#     mls - Multi Level Security protection.
SELINUXTYPE=targeted
Directives:
SELINUX
- Sets the activation mode for SELinux.
- Enforcing activates it and allows or denies actions based on the policy rules.
- Permissive activates SELinux, but permits all actions.
- It records all security violations.
- Useful for troubleshooting and developing or tuning the policy.
- The third option is to completely turn SELinux off. When running in enforcing mode
SELINUXTYPE
- Dictates the type of policy to be enforced.
- Default is targeted.
Determine the current operating mode:
getenforce
Change the state to permissive and verify:
[root@server30 ~]# setenforce permissive
[root@server30 ~]# getenforce
Permissive- Can also “0” for permissive and a “1” for enforcing.
- Changes will be lost at the next system reboot.
- Edit /etc/selinux/config SELINUX directive to the desired mode for persistence.
EXAM TIP: You may switch SELinux to permissive for troubleshooting a non-functioning service. Don’t forget to change it back to enforcing when the issue is resolved.
Disable SELinux persistently:
grubby --update-kernel ALL --args selinux=0
- Appends the selinux=0 setting to the end of the “options” line in the bootloader configuration file located in the /boot/loader/entries directory:
cat /boot/loader/entries/dcb323fab47049e8b89dae2ae00d41e8-5.14.0-427.26.1.el9_4.x86_64.conf Revert the above:
grubby --update-kernel ALL --remove-args selinux=0
Querying Status
sestatus Command
- View the current runtime status of SELinux
- Displays the location of principal directories, the policy in effect, and the activation mode.
[root@server30 ~]# sestatus
SELinux status:                 enabled
SELinuxfs mount:                /sys/fs/selinux
SELinux root directory:         /etc/selinux
Loaded policy name:             targeted
Current mode:                   permissive
Mode from config file:          enforcing
Policy MLS status:              enabled
Policy deny_unknown status:     allowed
Memory protection checking:     actual (secure)
Max kernel policy version:      33
-v
- Report on security contexts set on files and processes, as listed in /etc/sestatus.conf .
- Reports the contexts for the current process (Current context) and the init (systemd) process (Init context) under Process Contexts.
- Reveals the file contexts for the controlling terminal and associated files under File Contexts.
[root@server30 ~]# cat /etc/sestatus.conf
[files]
/etc/passwd
/etc/shadow
/bin/bash
/bin/login
/bin/sh
/sbin/agetty
/sbin/init
/sbin/mingetty
/usr/sbin/sshd
/lib/libc.so.6
/lib/ld-linux.so.2
/lib/ld.so.1

[process]
/sbin/mingetty
/sbin/agetty
/usr/sbin/sshd[root@server30 ~]# sestatus -v
SELinux status: enabled
SELinuxfs mount: /sys/fs/selinux
SELinux root directory: /etc/selinux
Loaded policy name: targeted
Current mode: permissive
Mode from config file: enforcing
Policy MLS status: enabled
Policy deny_unknown status: allowed
Memory protection checking: actual (secure)
Max kernel policy version: 33
Process contexts:
Current context: unconfined_u:unconfined_r:unconfined_t:s0-s0:c0.c1023
Init context: system_u:system_r:init_t:s0
/sbin/agetty system_u:system_r:getty_t:s0-s0:c0.c1023
/usr/sbin/sshd system_u:system_r:sshd_t:s0-s0:c0.c1023
File contexts:
Controlling terminal: unconfined_u:object_r:user_devpts_t:s0
/etc/passwd system_u:object_r:passwd_file_t:s0
/etc/shadow system_u:object_r:shadow_t:s0
/bin/bash system_u:object_r:shell_exec_t:s0
/bin/login system_u:object_r:login_exec_t:s0
/bin/sh system_u:object_r:bin_t:s0 -> system_u:object_r:shell_exec_t:s0
/sbin/agetty system_u:object_r:getty_exec_t:s0
/sbin/init system_u:object_r:bin_t:s0 -> system_u:object_r:init_exec_t:s0
/usr/sbin/sshd system_u:object_r:sshd_exec_t:s0Lab: Modify SELinux File Context
- Create a directory sedir1 under /tmp and a file sefile1 under sedir1.
- Check the context on the directory and file.
- Change the SELinux user and type to user_u and public_content_t on both and verify.
1. Create the hierarchy sedir1/sefile1 under /tmp:
 [root@server30 ~]# cd /tmp
 [root@server30 tmp]# mkdir sedir1
 [root@server30 tmp]# touch sedir1/sefile1
2. Determine the context on the new directory and file:
 [root@server30 tmp]# ls -ldZ sedir1
drwxr-xr-x. 2 root root unconfined_u:object_r:user_tmp_t:s0 21 Jul 28 15:12 sedir1 [root@server30 tmp]# ls -ldZ sedir1/sefile1
-rw-r--r--. 1 root root unconfined_u:object_r:user_tmp_t:s0 0 Jul 28 15:12 sedir1/sefile13. Modify the SELinux user (-u) on the directory to user_u and type
(-t) to public_content_t recursively (-R) with the chcon command:
 [root@server30 tmp]# chcon -vu user_u -t  public_content_t sedir1 -R
 changing security context of 'sedir1/sefile1'
 changing security context of 'sedir1'
4. Validate the new context:
 [root@server30 tmp]# ls -ldZ sedir1
drwxr-xr-x. 2 root root user_u:object_r:public_content_t:s0 21 Jul 28 15:12 sedir1 [root@server30 tmp]# ls -ldZ sedir1/sefile1
-rw-r--r--. 1 root root user_u:object_r:public_content_t:s0 0 Jul 28 15:12 sedir1/sefile1Lab: Add and Apply File Context
- Add the current context on sedir1 to the SELinux policy database to ensure a relabeling will not reset it to its previous value
- Change the context on the directory to some random values.
- Restore the default context from the policy database back to the directory recursively.
- Determine the current context:
 [root@server30 tmp]# ls -ldZ sedir1
drwxr-xr-x. 2 root root user_u:object_r:public_content_t:s0 21 Jul 28 15:12 sedir1 [root@server30 tmp]# ls -ldZ sedir1/sefile1
-rw-r--r--. 1 root root user_u:object_r:public_content_t:s0 0 Jul 28 15:12 sedir1/sefile1- Add (-a) the directory recursively to the policy database using the
semanagecommand with thefcontextsubcommand:
[root@server30 tmp]# semanage fcontext -a -s user_u -t public_content_t "/tmp/sedir1(/.*)?"- The regular expression (/.*)? instructs the command to include all files and subdirectories under /tmp/sedir1.
- Needed only if recursion is required.
The above command added the context to the /etc/selinux/targeted/contexts/files/file_contexts.local file.
- Validate the addition by listing (-l) the recent changes (-C) in the policy database:
 [root@server30 tmp]# semanage fcontext -Cl | grep  sedir
/tmp/sedir1(/.*)? all files user_u:object_r:public_content_t:s0 - Change the current context on sedir1 to something random (staff_u/etc_t) with the
chconcommand:
 root@server30 tmp]# chcon -vu staff_u -t etc_t  sedir1 -R
 changing security context of 'sedir1/sefile1'
changing security context of 'sedir1'- The security context is changed successfully. Confirm with the
lscommand:
 [root@server30 tmp]# ls -ldZ sedir1 ; ls -lZ  sedir1/sefile1
 drwxr-xr-x. 2 root root staff_u:object_r:etc_t:s0  21 Jul 28 15:12 sedir1
-rw-r--r--. 1 root root staff_u:object_r:etc_t:s0 0 Jul 28 15:12 sedir1/sefile1- Reinstate the context on the sedir1 directory recursively (
-R) as stored in the policy database using therestoreconcommand: (-F option will update all attributes, only does type by default. )
$ restorecon -R -v -F sedir1
Relabeled /tmp/sedir1 from unconfined_u:object_r:public_content_t:s0 to user_u:object_r:public_content_t:s0
Relabeled /tmp/sedir1/sefile1 from unconfined_u:object_r:public_content_t:s0 to user_u:object_r:public_content_t:s0
Lab: Add and Delete Network Ports
- Add a non-standard network port 8010 to the SELinux policy database for the httpd service.
- Confirm the addition.
- Remove the port from the policy and verify the deletion.
- List (
-l) the ports for the httpd service as defined in the SELinux policy database:
 [root@server10 ~]# semanage port -l | grep ^http_port
 http_port_t                    tcp      80, 81, 443, 488, 8008, 8009, 8443, 9000
The output reveals eight network ports the httpd process is currently allowed to listen on.
- Add port 8010 with type
http_port_tand protocol tcp to the policy:
[root@server10 ~]# semanage port -at http_port_t -p tcp 8010- Confirm the addition:
 [root@server10 ~]# semanage port -l | grep ^http_port
http_port_t tcp 8010, 80, 81, 443, 488, 8008, 8009, 8443, 9000- Delete port
8010from the policy and confirm:
 [root@server10 ~]# semanage port -dp tcp 8010
 [root@server10 ~]# semanage port -l | grep ^http_port
 http_port_t                    tcp      80, 81,  443, 488, 8008, 8009, 8443, 9000
EXAM TIP: Any non-standard port you want to use for any service, make certain to add it to the SELinux policy database with the correct type.
Lab: Copy Files with and without Context
- Create a file called sefile2 under /tmp and display its context.
- Copy this file to the /etc/default directory, and observe the change in the context.
- Remove sefile2 from /etc/default, and copy it again to the same destination, ensuring that the target file receives the source file’s context.
1. Create file sefile2 under /tmp and show context:
 [root@server10 ~]# touch /tmp/sefile2
 [root@server10 ~]# ls -lZ /tmp/sefile2
 -rw-r--r--. 1 root root  unconfined_u:object_r:user_tmp_t:s0 0 Jul 29 08:44  /tmp/sefile2
2. Copy this file to the /etc/default directory, and check the context again:
 [root@server10 ~]# cp /tmp/sefile2 /etc/default/

 [root@server10 ~]# ls -lZ /etc/default/sefile2
 -rw-r--r--. 1 root root  unconfined_u:object_r:etc_t:s0 0 Jul 29 08:45  /etc/default/sefile2
3. Erase the /etc/default/sefile2 file, and copy it again with the --preserve=context option:
 [root@server10 ~]# rm /etc/default/sefile2

 [root@server10 ~]# cp --preserve=context  /tmp/sefile2 /etc/default
4. List the file to view the context:
 [root@server10 ~]# ls -lZ /etc/default/sefile2
 -rw-r--r--. 1 root root  unconfined_u:object_r:user_tmp_t:s0 0 Jul 29 08:49  /etc/default/sefile2
Exercise 20-5: View and Toggle SELinux Boolean Values
- Display the current state of the Boolean
nfs_export_all_rw. - Toggle its value temporarily, and reboot the system.
- Flip its value persistently after the system has been back up.
1. Display the current setting of the Boolean nfs_export_all_rw using three different commands—getsebool, sestatus, and semanage:
 [root@server10 ~]# getsebool -a | grep  nfs_export_all_rw
 nfs_export_all_rw --> on

 [root@server10 ~]# sestatus -b | grep  nfs_export_all_rw
 nfs_export_all_rw                           on

 [root@server10 ~]# semanage boolean -l | grep  nfs_export_all_rw
 nfs_export_all_rw              (on   ,   on)  Allow  nfs to export all rw
 [root@server10 ~]#
2. Turn off the value of nfs_export_all_rw using the setsebool command by simply furnishing “off” or “0” with it and confirm:
 [root@server10 ~]# setsebool nfs_export_all_rw 0

 [root@server10 ~]# getsebool -a | grep  nfs_export_all_rw
 nfs_export_all_rw --> off
3. Reboot the system and rerun the getsebool command to check the Boolean state:
 [root@server10 ~]# getsebool -a | grep  nfs_export_all_rw
 nfs_export_all_rw --> on
4. Set the value of the Boolean persistently (-P or -m as needed) using either of the following:
 [root@server10 ~]# setsebool -P nfs_export_all_rw off
 [root@server10 ~]# semanage boolean -m -0  nfs_export_all_rw
5. Validate the new value using the getsebool, sestatus, or semanage command:
 [root@server10 ~]# sestatus -b | grep  nfs_export_all_rw
 nfs_export_all_rw                           off
 [root@server10 ~]# semanage boolean -l | grep  nfs_export_all_rw
 nfs_export_all_rw              (off  ,  off)  Allow  nfs to export all rw
 [root@server10 ~]# semanage boolean -l | grep  nfs_export_all_rw
 nfs_export_all_rw              (off  ,  off)  Allow  nfs to export all rw
Monitoring and Analyzing SELinux Violations
-
SELinux generates alerts for system activities when it runs in enforcing or permissive mode.
-
It writes the alerts to /var/log/audit/audit.logif the auditd daemon is running, or to /var/log/messages via the rsyslog daemon in the absence of auditd.
-
SELinux also logs the alerts that are generated due to denial of an action, and identifies them with a type tag AVC (Access Vector Cache) in the audit.log file.
-
It also writes the rejection in the messages file with a message ID, and how to view the message details.
-
SELinux denial messages are analyzed, and the audit data is examined to identify the potential cause of the rejection.
-
The results of the analysis are recorded with recommendations on how to fix it.
-
These results can be reviewed to aid in troubleshooting, and recommended actions taken to address the issue.
-
SELinux runs a service daemon called setroubleshootd that performs this analysis and examination in the background.
-
This service also has a client interface called SELinux Troubleshooter (the
sealertcommand) that reads the data and displays it for assessment. -
The client tool has both text and graphical interfaces.
-
The server and client components are part of the
setroubleshoot-serversoftware package that must be installed on the system prior to using this service.
How SELinux handles an incoming access request (from a subject) to a target object:
Subject (eg: a process) makes an Action request (eg: read) > SELinux Security Server checks the SELinux Policy Database > if permission is not granted the AVC Denied Message is diaplayed. If Permission is granted, then access to object (eg: a file) is granted.
su to root from user1 and view the log:
 [root@server10 ~]# cat /var/log/audit/audit.log |  tail -10
 ...
 type=USER_START msg=audit(1722274070.748:90):  pid=1394 uid=1000 auid=0 ses=1  subj=unconfined_u:unconfined_r:unconfined_t:s0- s0:c0.c1023 msg='op=PAM:session_open  grantors=pam_keyinit,pam_limits,pam_systemd,pam_unix, pam_umask,pam_xauth acct="root" exe="/usr/bin/su"  hostname=? addr=? terminal=/dev/pts/0  res=success'UID="user1" AUID="root"
WIll show avc denied if denied.
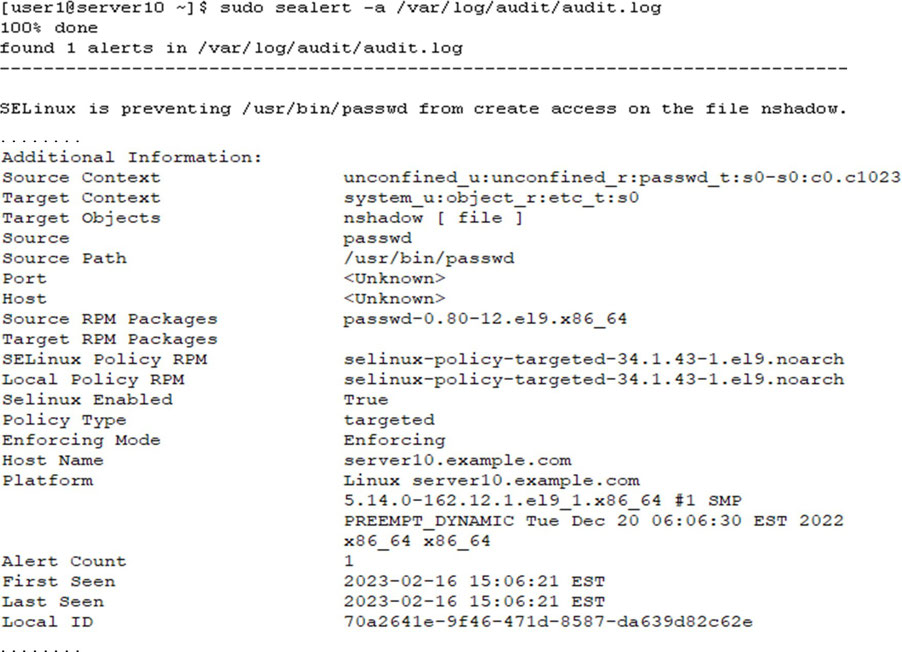
Lab Get an AVC deny message
- Change the SELinux type on the shadow file to something random (etc_t).
- Issue the
passwdcommand as user1 to modify the password. - Restored the type on the shadow file with
restorecon /etc/shadow. ' - Re-try the password change.
- Change the SELinux type on /etc/shadow to something random (etc_t)
 [root@server10 ~]# chcon -vt etc_t /etc/shadow
changing security context of '/etc/shadow'- Issue the
passwdcommand as user1 to modify the password:
 [root@server10 ~]# su user1
 [user1@server10 root]$ passwd
 Changing password for user user1.
 Current password:
 roopasswd: Authentication token manipulation error
The following is a sample denial record from the same file in raw format:

- AVC type
- Related to the
passwdcommand (comm) - Source context (
scontext)unconfined_u:unconfined_r:passwd_t:s0-s0:c0.c1023 - nshadow file (name) with file type (tclass) “file”
- Target context (tcontext)
system_u:object_r:etc_t:s0 - Indicates the SELinux operating mode, which is enforcing
permissive=0. - This message indicates that the /etc/shadow file does not have the correct context set on it, and that’s why SELinux prevented the
passwdcommand from updating the user’s password.
Use sealert to analyze (-a) all AVC records in the audit.log file. This command produces a formatted report with all relevant details: